094-Bioconductor没想象的那么简单(part1)
刘小泽写于19.3.24
一直以来我认为Bioconductor主要就是下载生信R包、看看一些说明书,但是它的强大远超想象,所有关于R基础对象的知识都能在这里学习到,其实里面的许多教程都是开放的,只是平时我们想不起来学。但是接触到三个单细胞的R包(Seurat、Scater、Monocle)后,我发现,对象的理解是那么的重要,于是我找了这个关于整体学习Bioconductor的学习资料,也与你分享
资料链接在:https://bioconductor.github.io/BiocWorkshops/r-and-bioconductor-for-everyone-an-introduction.html
这是2018年的Bioconductor出品的课程,涵盖了基础R知识、Bioconductor架构、实际分析与Bioconductor关系,学它肯定没错的,掌握对象的知识后,也许一些复杂的R包学起来就会变得轻松一些
这里跳过第一部分introduction,直接从第二部分(书中编号100)开始,我会提炼自己认为比较重要的地方
这个教程为了打消大家对R和Bioconductor的为难情绪,首先说明了:This workshop is intended for those with little or no experience using R or Bioconductor.
关于R的基础内容[带有示例数据]
创建示例数据最快的方法:在一个新文件夹中新建一个Rproject,然后新建一个文本,其中包含如下信息
# 先拷贝原始数据,在https://raw.githubusercontent.com/Bioconductor/BiocWorkshops/master/100_Morgan_RBiocForAll/ALL-phenoData.csv

$cat >ALL-phenoData.csv
# 再粘贴(最后ctrl + c)
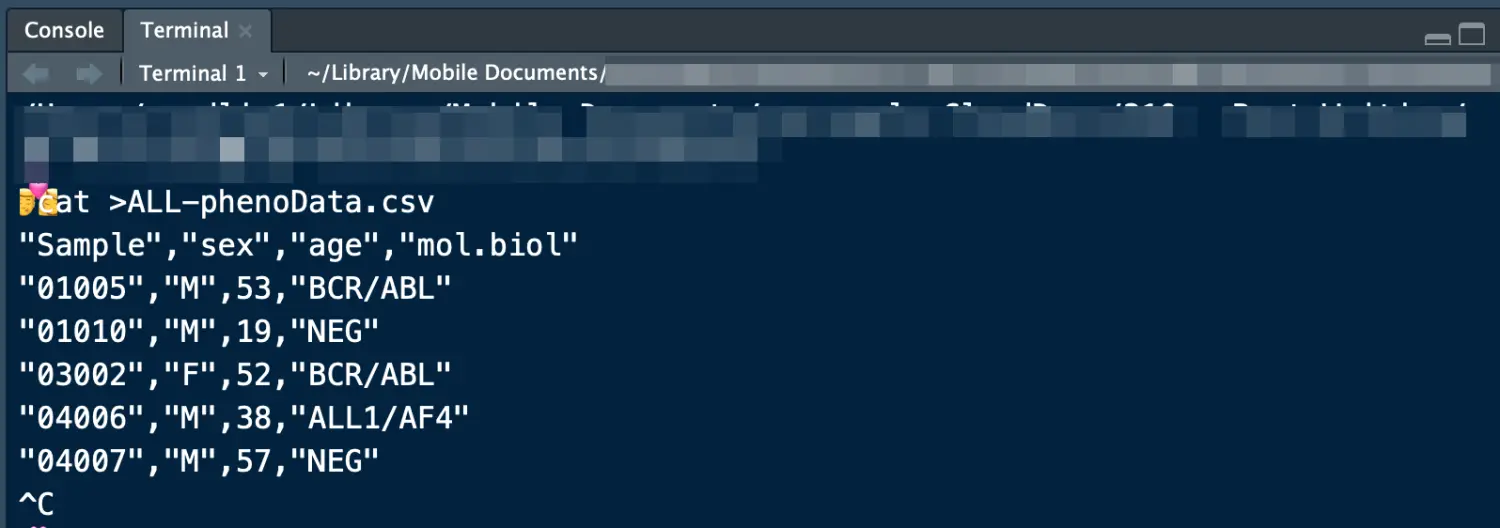
然后你就会看到当前目录下就会新增一个ALL-phenoData.csv文件

其中,sample表示样本ID号;sex是每个病人的性别;age是年龄;mol.biol是每个病人的细胞学表征,
BCR/ABL表示存在典型的BCR/ABL易位,NEG表示没有特别的细胞学信息
我们上面是自己新建的文件,所以我们清楚知道它在什么位置,但是如果想找到某个文件的路径应该怎么弄?
可以利用
file.choose(),它会弹出一个对话框,让你去找你想找的文件,然后返回它的路径,当然我们可以同时把返回值赋给一个变量> fname <- file.choose() > fname [1] "/Users/bioconductor/ALL-phenoData.csv" # 利用file.exists()检查文件是否存在 > file.exists(fname) [1] TRUE #读入文件 > pdata <- read.csv(fname) #然后还是标准的检查 dim(pdata) head(pdata) summary(pdata)这样R默认会把第一列
Sample也当成数值,summary统计结果就会将sample这一列也进行统计> summary(pdata) Sample sex age mol.biol 01003 : 1 F :42 Min. : 5.00 ALL1/AF4:10 01005 : 1 M :83 1st Qu.:19.00 BCR/ABL :37 01007 : 1 NA's: 3 Median :29.00 E2A/PBX1: 5 01010 : 1 Mean :32.37 NEG :74 02020 : 1 3rd Qu.:45.50 NUP-98 : 1 03002 : 1 Max. :58.00 p15/p16 : 1 (Other):122 NA's :5 > typeof(pdata$Sample) [1] "integer"这里显示第一列被识别为整数,但其实第一列信息就是字符,因此如果我们清楚知道导入的数据每一列是什么类型,那么就可以导入时直接指定:
# 提前指定每列的类型
> pdata <- read.csv(
  fname,
  colClasses = c("character", "factor", "integer", "factor")
)
> summary(pdata)
    Sample            sex          age            mol.biol
 Length:128         F   :42   Min.   : 5.00   ALL1/AF4:10
 Class :character   M   :83   1st Qu.:19.00   BCR/ABL :37
 Mode  :character   NA's: 3   Median :29.00   E2A/PBX1: 5
                              Mean   :32.37   NEG     :74
                              3rd Qu.:45.50   NUP-98  : 1
                              Max.   :58.00   p15/p16 : 1
                              NA's   :5
A %in% B表示向量A中的元素是否在向量B中出现,返回逻辑值# 检查A中是否包含B的信息[这里没有全部列出] > pdata$mol.biol %in% c("BCR/ABL", "NEG") [1] TRUE TRUE TRUE FALSE TRUE ...subset取子集# 取子集 > subset(pdata, sex == "F" & age > 50) Sample sex age mol.biol 3 03002 F 52 BCR/ABL 27 16004 F 58 ALL1/AF4 30 20002 F 58 BCR/ABL 39 24011 F 51 BCR/ABL 58 28021 F 54 BCR/ABL 63 28032 F 52 ALL1/AF4 71 30001 F 54 BCR/ABL 84 57001 F 53 NEG同样也可以选出
mol.biol为BCR/ABL或NEG的行> bcrabl <- subset(pdata, mol.biol %in% c("BCR/ABL", "NEG")) > dim( bcrabl ) [1] 111 4 # 然后table看一些(table的意思就是 tabular summary) > table(bcrabl$mol.biol) ALL1/AF4 BCR/ABL E2A/PBX1 NEG NUP-98 p15/p16 0 37 0 74 0 0 # 因为我们只选了BCR/ABL和NEG两项,因此其他的都是空白,想要只看选出来的这两项信息,可以 > factor(bcrabl$mol.biol) [1] BCR/ABL NEG BCR/ABL NEG NEG NEG NEG NEG BCR/ABL [10] BCR/ABL NEG NEG BCR/ABL NEG BCR/ABL BCR/ABL BCR/ABL BCR/ABL ... # 更新一下bcrabl的mol.biol列(看前后Levels的变化) # (之前) > bcrabl$mol.biol [1] BCR/ABL NEG BCR/ABL NEG NEG NEG NEG NEG BCR/ABL ... Levels: ALL1/AF4 BCR/ABL E2A/PBX1 NEG NUP-98 p15/p16 # (之后) > bcrabl$mol.biol <- factor(bcrabl$mol.biol) > bcrabl$mol.biol [1] BCR/ABL NEG BCR/ABL NEG NEG NEG NEG NEG BCR/ABL ... Levels: BCR/ABL NEGformula公式的使用这个在R中是一个非常常用的概念,左边是因变量,右边是自变量,例如
age ~ mol.biol就表示年龄随着细胞学表征的变化boxplot(age ~ mol.biol, bcrabl)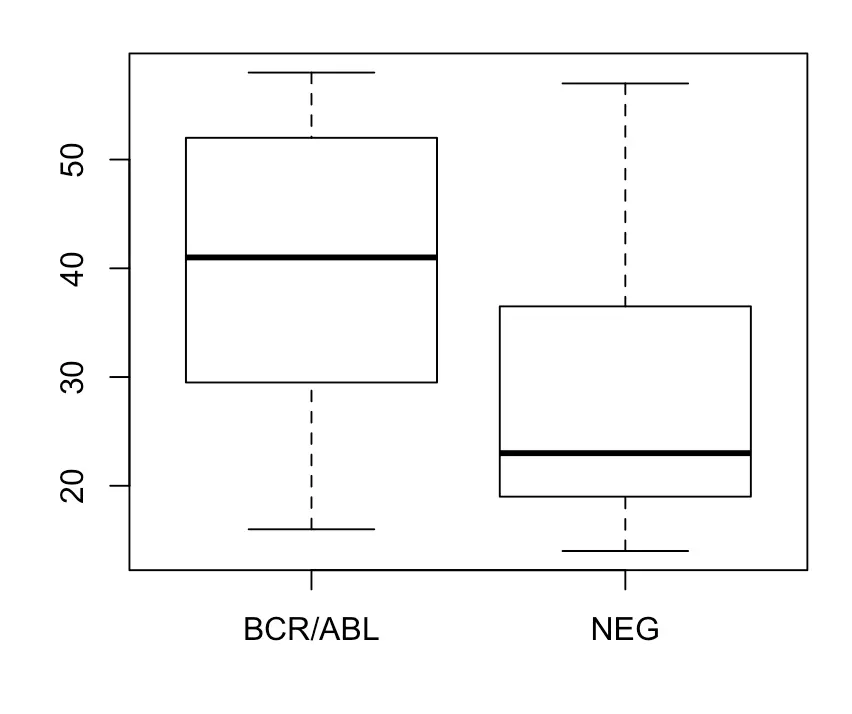
从箱线图中就可以清楚看出,
BCR/ABL的人平均年龄比NEG偏高,可以再结合t检验进行验证t检验是1908年德国啤酒厂的一个员工发明,自谦为student,也就是t的来源。它为了比较两组正态分布数据均值的差异,适用于连续的计量指标,结果看P值 具体可以搜索"一图读懂丨t检验 VS 卡方检验、参数检验 VS 非参数检验”(来自医学美图)
> t.test(age ~ mol.biol, bcrabl)
p-value = 8.401e-06
使用ggplot作图是这样:
> library(ggplot2)
> ggplot(bcrabl, aes(x = mol.biol, y = age)) + geom_boxplot()
关于Bioconductor的基础内容
Bioconductor是一个包含了150多个统计和组学数据包的集合,最初为芯片数据开发,现在支持 bulk and single-cell RNA-seq, ChIP seq, copy number analysis, microarray methylation and classic expression analysis, flow cytometry等等
官网在这里:https://bioconductor.org/
所有的包在这里:https://bioconductor.org/packages
快速查找包的说明书:例如browseVignettes("clusterProfiler")
快速查找正确的包的名称:例如:BiocManager::available("deseq"),然后会返回许多相关的包的名称
学习两个和基因组坐标有关的两个包
- rtracklayer
提供了
import函数,可以读取多种基因组数据类型(e.g., BED, GTF, VCF, FASTA)作为对象 - GenomicRanges 可以方便对基因组坐标进行操作,(e.g. descriptions of exons, genes, ChIP peaks, called variants)
示例数据下载:
保存为CpGislands.Hsapiens.hg38.UCSC.bed
这个文件包含了人类基因组中CpG islands 的坐标
CpG 岛主要位于基因的启动子(promotor)和第一外显子区域,约有 60%以上基因的启动子含有 CpG 岛;CpG 岛的 GC 含量大于 50%,长度超过 200bp。
$ head  CpGislands.Hsapiens.hg38.UCSC.bed
chr1    155188536   155192004   CpG:_361
chr1    2226773 2229734 CpG:_366
chr1    36306229    36307408    CpG:_110
chr1    47708822    47710847    CpG:_164
chr1    53737729    53739637    CpG:_221
chr1    144179071   144179313   CpG:_20
首先导入数据
> library(rtracklayer)
> fname <- file.choose()
> cpg <- import(fname)
> cpg
GRanges object with 30477 ranges and 1 metadata column:
                         seqnames              ranges strand |        name
                            <Rle>           <IRanges>  <Rle> | <character>
      [1]                    chr1 155188537-155192004      * |    CpG:_361
      [2]                    chr1     2226774-2229734      * |    CpG:_366
      [3]                    chr1   36306230-36307408      * |    CpG:_110
      [4]                    chr1   47708823-47710847      * |    CpG:_164
      [5]                    chr1   53737730-53739637      * |    CpG:_221
      ...                     ...                 ...    ... .         ...
  [30473] chr22_KI270734v1_random       131010-132049      * |    CpG:_102
  [30474] chr22_KI270734v1_random       161257-161626      * |     CpG:_55
  [30475] chr22_KI270735v1_random         17221-18098      * |    CpG:_100
  [30476] chr22_KI270738v1_random           4413-5280      * |     CpG:_80
  [30477] chr22_KI270738v1_random           6226-6467      * |     CpG:_34
  -------
  seqinfo: 254 sequences from an unspecified genome; no seqlengths
关于Bed文件格式:
BED文件 [简而言之,坐标从0开始定义,坐标范围"半开放”(包括左边的坐标,不包括右边坐标)]。然后Bioconductor(如import) 导入后进行了一个坐标的转换,首先改成了从1开始,并且左右两个坐标都包含进来
操作 genomic ranges =》得到位置
为了方便演示,示例数据使用了标准的染色体1-22+X+Y,首先利用keepStandardChromosomes 去除一些非标准命名的染色体,例如上面👆的chr22_KI270738v1_random
> #Subsetting operation that returns only the 'standard' chromosomes.
> ## Use pruning.mode="coarse" to drop list elements with mixed seqlevels:
> cpg <- keepStandardChromosomes(cpg, pruning.mode = "coarse")
> cpg
GRanges object with 27949 ranges and 1 metadata column:
          seqnames              ranges strand |        name
             <Rle>           <IRanges>  <Rle> | <character>
      [1]     chr1 155188537-155192004      * |    CpG:_361
      [2]     chr1     2226774-2229734      * |    CpG:_366
      [3]     chr1   36306230-36307408      * |    CpG:_110
      [4]     chr1   47708823-47710847      * |    CpG:_164
      [5]     chr1   53737730-53739637      * |    CpG:_221
      ...      ...                 ...    ... .         ...
  [27945]    chr22   50704375-50704880      * |     CpG:_38
  [27946]    chr22   50710878-50711294      * |     CpG:_41
  [27947]    chr22   50719959-50721632      * |    CpG:_180
  [27948]    chr22   50730600-50731304      * |     CpG:_65
  [27949]    chr22   50783345-50783889      * |     CpG:_63
  -------
  seqinfo: 24 sequences from an unspecified genome; no seqlengths
过滤后只剩27949个记录,原来是30477个,得到的结果就是一个GenomicRanges对象
关于GenomicRanges对象: 必需条目:
seqnames表示染色体编号、ranges起始终止坐标、strand正负链 可选条目:例如本数据中的name
- 使用函数
start(cpg)、end(cpg)、width(cpg)可以得到各个CpG的起始终止坐标以及每个CpG的长度
> head( start(cpg) )
[1] 155188537   2226774  36306230  47708823  53737730 144179072
> head( cpg$name )
[1] "CpG:_361" "CpG:_366" "CpG:_110" "CpG:_164" "CpG:_221" "CpG:_20"
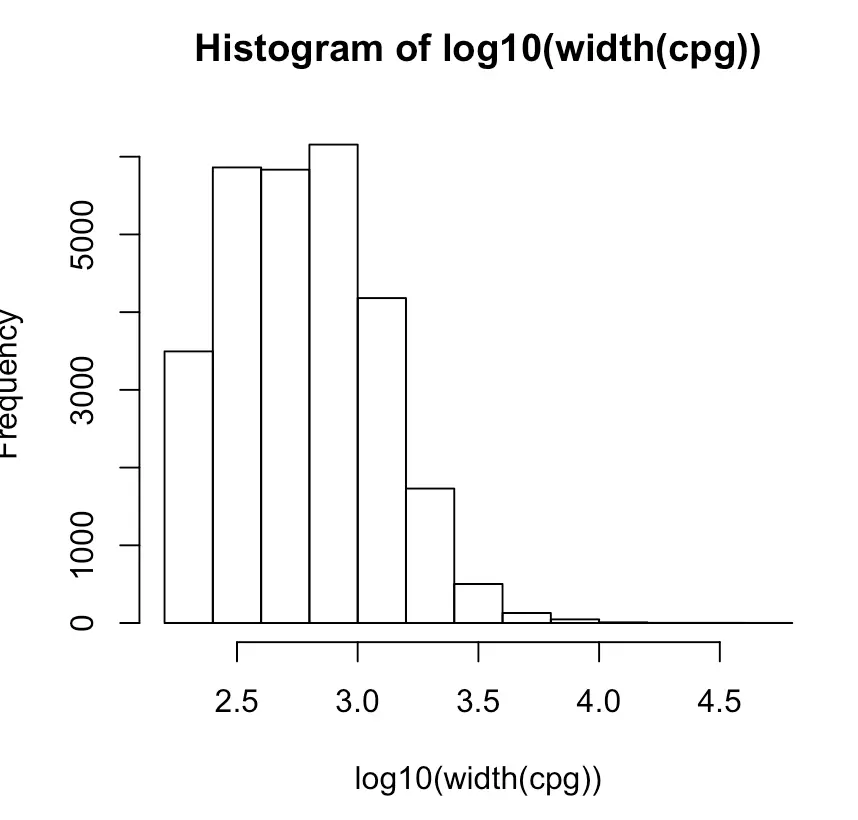
- 想看看CpG island的长度分布(可以先进行log10转换,减少数据)
hist(log10(width(cpg)))
取子集
利用subset取出1、2号染色体上的CpG islands
> subset(cpg, seqnames %in% c("chr1", "chr2"))
GRanges object with 4217 ranges and 1 metadata column:
         seqnames              ranges strand |        name
            <Rle>           <IRanges>  <Rle> | <character>
     [1]     chr1 155188537-155192004      * |    CpG:_361
     [2]     chr1     2226774-2229734      * |    CpG:_366
     [3]     chr1   36306230-36307408      * |    CpG:_110
     [4]     chr1   47708823-47710847      * |    CpG:_164
     [5]     chr1   53737730-53739637      * |    CpG:_221
     ...      ...                 ...    ... .         ...
  [4213]     chr2 242003256-242004412      * |     CpG:_79
  [4214]     chr2 242006590-242010686      * |    CpG:_263
  [4215]     chr2 242045491-242045723      * |     CpG:_16
  [4216]     chr2 242046615-242047706      * |    CpG:_170
  [4217]     chr2 242088150-242089411      * |    CpG:_149
  -------
  seqinfo: 24 sequences from an unspecified genome; no seqlengths
操作Genomic annotations =》得到注释
比如可以加载hg38的UCSC已知基因数据
library("TxDb.Hsapiens.UCSC.hg38.knownGene")
- 提取所有转录本坐标
> tx <- transcripts(TxDb.Hsapiens.UCSC.hg38.knownGene)
> tx
GRanges object with 197782 ranges and 2 metadata columns:
                   seqnames        ranges strand |     tx_id     tx_name
                      <Rle>     <IRanges>  <Rle> | <integer> <character>
       [1]             chr1   29554-31097      + |         1  uc057aty.1
       [2]             chr1   30267-31109      + |         2  uc057atz.1
       [3]             chr1   30366-30503      + |         3  uc031tlb.1
       [4]             chr1   69091-70008      + |         4  uc001aal.1
       [5]             chr1 160446-161525      + |         5  uc057aum.1
       ...              ...           ...    ... .       ...         ...
  [197778] chrUn_KI270750v1 148668-148843      + |    197778  uc064xrp.1
  [197779] chrUn_KI270752v1       144-268      + |    197779  uc064xrq.1
  [197780] chrUn_KI270752v1   21813-21944      + |    197780  uc064xrt.1
  [197781] chrUn_KI270752v1     3497-3623      - |    197781  uc064xrr.1
  [197782] chrUn_KI270752v1    9943-10067      - |    197782  uc064xrs.1
  -------
  seqinfo: 455 sequences (1 circular) from hg38 genome
- 同样也是保留标准的染色体,为了和上面得到的
cpg对象无缝拼接
> tx <- keepStandardChromosomes(tx, pruning.mode="coarse")
> tx
GRanges object with 182435 ranges and 2 metadata columns:
           seqnames        ranges strand |     tx_id     tx_name
              <Rle>     <IRanges>  <Rle> | <integer> <character>
       [1]     chr1   29554-31097      + |         1  uc057aty.1
       [2]     chr1   30267-31109      + |         2  uc057atz.1
       [3]     chr1   30366-30503      + |         3  uc031tlb.1
       [4]     chr1   69091-70008      + |         4  uc001aal.1
       [5]     chr1 160446-161525      + |         5  uc057aum.1
       ...      ...           ...    ... .       ...         ...
  [182431]     chrM     5826-5891      - |    182431  uc064xpa.1
  [182432]     chrM     7446-7514      - |    182432  uc064xpb.1
  [182433]     chrM   14149-14673      - |    182433  uc064xpm.1
  [182434]     chrM   14674-14742      - |    182434  uc022bqv.3
  [182435]     chrM   15956-16023      - |    182435  uc022bqx.2
  -------
  seqinfo: 25 sequences (1 circular) from hg38 genome
可以看到由197782变成了182435个
得到overlap
- 统计两个不同对象的overlap,例如统计每个转录本上CpG island的数目
> olaps <- countOverlaps(tx, cpg)
# 用法:countOverlaps(query, subject,...)。我们的问题是基于转录本,因此这里转录本(tx对象)就是query,CpG数(cpg对象)就是subject
> length(olaps)
[1] 182435  # 每个转录本都统计了一次
> table(olaps)
olaps
    0     1     2     3     4     5     6     7     8     9    10    11
94621 70551 10983  3228  1317   595   351   214   153    93    64    39
   12    13    14    15    16    17    18    19    20    21    22    23
   41    31    21    20    17     8    14     8     7     3     6     6
   24    25    26    27    28    29    30    31    32    33    34    35
    3     2     4     1     3     2     6     5     3     3     1     2
   36    37    38    63
    3     1     1     4
# 发现有94621个转录本上是没有CpG island的
- 将结果添加到
GRanges对象【这里也看出了对象的好处:可以随时增加、调取许多有用的信息】:
> tx$cpgOverlaps <- countOverlaps(tx, cpg)
> tx
GRanges object with 182435 ranges and 3 metadata columns:
           seqnames        ranges strand |     tx_id     tx_name cpgOverlaps
              <Rle>     <IRanges>  <Rle> | <integer> <character>   <integer>
       [1]     chr1   29554-31097      + |         1  uc057aty.1           1
       [2]     chr1   30267-31109      + |         2  uc057atz.1           0
       [3]     chr1   30366-30503      + |         3  uc031tlb.1           0
       [4]     chr1   69091-70008      + |         4  uc001aal.1           0
       [5]     chr1 160446-161525      + |         5  uc057aum.1           0
       ...      ...           ...    ... .       ...         ...         ...
  [182431]     chrM     5826-5891      - |    182431  uc064xpa.1           0
  [182432]     chrM     7446-7514      - |    182432  uc064xpb.1           0
  [182433]     chrM   14149-14673      - |    182433  uc064xpm.1           0
  [182434]     chrM   14674-14742      - |    182434  uc022bqv.3           0
  [182435]     chrM   15956-16023      - |    182435  uc022bqx.2           0
  -------
  seqinfo: 25 sequences (1 circular) from hg38 genome
- 然后就可以取子集,例如
# 取出有10个以上CpG的转录本
subset(tx, cpgOverlaps > 10)
学习处理summarized experimental data
主要使用
SummarizedExperiment 包和处理SummarizedExperiment对象
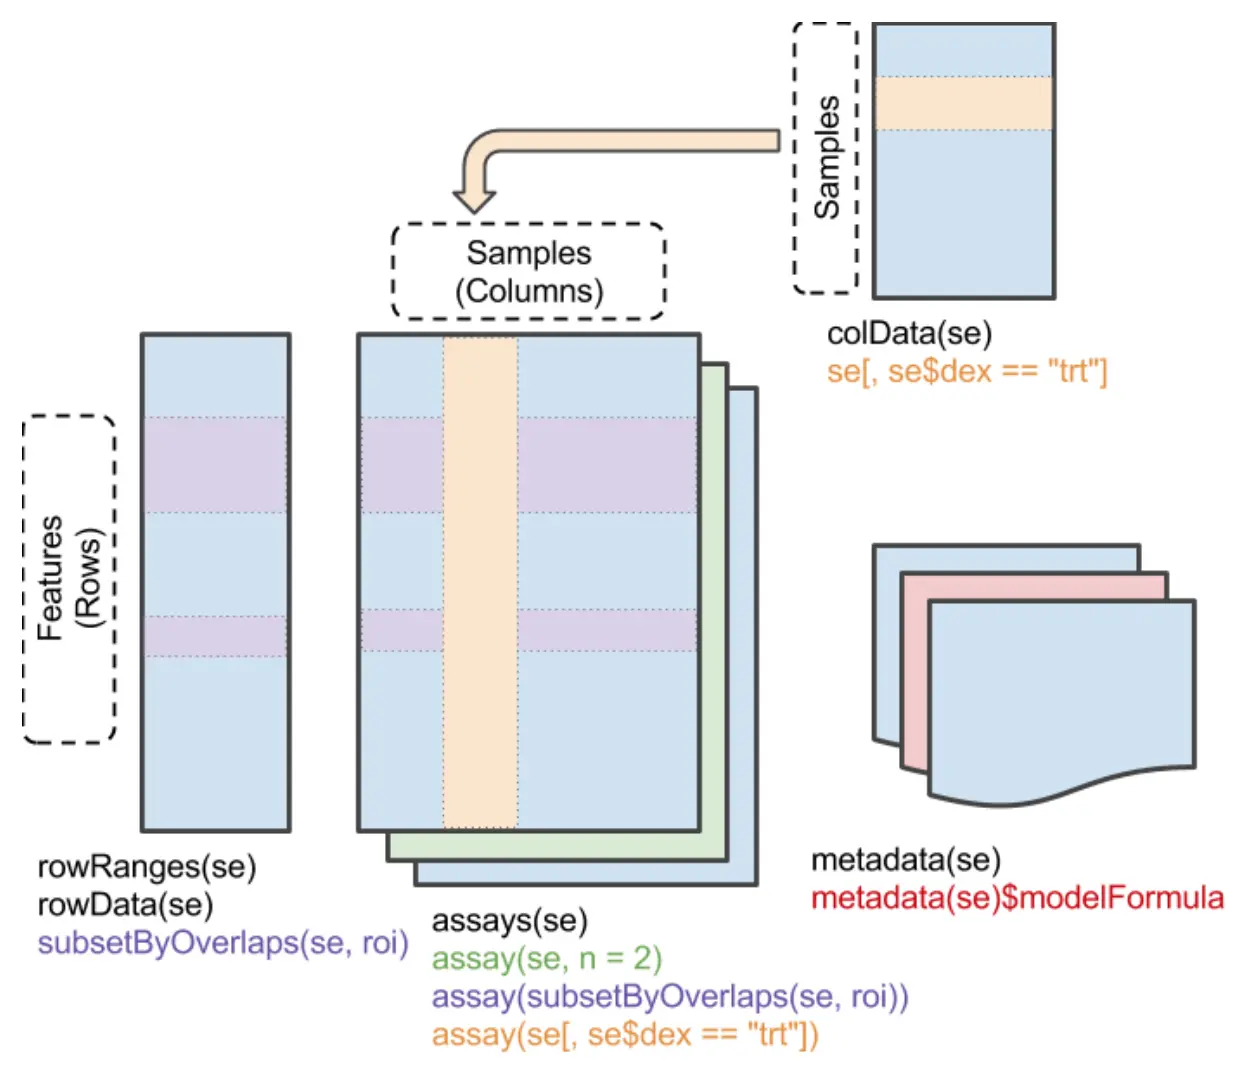
SummarizedExperiment对象一般包括多个assays,每一个assay都和矩阵相似,有行和列两个维度,行表示features(如:基因、转录本、外显子等),列表示样本,矩阵中的每个元素表示一个具体的值(例如:表达量数值)
构建对象
数据下载:https://raw.githubusercontent.com/Bioconductor/BiocWorkshops/master/100_Morgan_RBiocForAll/airway_colData.csv
首先读取数据(地塞米松处理4个人的平滑肌细胞RNAseq的8个样本)[详细数据说明看:
browseVignettes("airway")]> fname <- file.choose() # airway_colData.csv > colData <- read.csv(fname, row.names = 1) > colData SampleName cell dex albut Run avgLength Experiment SRR1039508 GSM1275862 N61311 untrt untrt SRR1039508 126 SRX384345 SRR1039509 GSM1275863 N61311 trt untrt SRR1039509 126 SRX384346 SRR1039512 GSM1275866 N052611 untrt untrt SRR1039512 126 SRX384349 SRR1039513 GSM1275867 N052611 trt untrt SRR1039513 87 SRX384350 SRR1039516 GSM1275870 N080611 untrt untrt SRR1039516 120 SRX384353 SRR1039517 GSM1275871 N080611 trt untrt SRR1039517 126 SRX384354 SRR1039520 GSM1275874 N061011 untrt untrt SRR1039520 101 SRX384357 SRR1039521 GSM1275875 N061011 trt untrt SRR1039521 98 SRX384358 Sample BioSample SRR1039508 SRS508568 SAMN02422669 SRR1039509 SRS508567 SAMN02422675 SRR1039512 SRS508571 SAMN02422678 SRR1039513 SRS508572 SAMN02422670 SRR1039516 SRS508575 SAMN02422682 SRR1039517 SRS508576 SAMN02422673 SRR1039520 SRS508579 SAMN02422683 SRR1039521 SRS508580 SAMN02422677其中
SampleName、Run、Experiment、Sample、BioSample是SRA数据库中获得的;cell是使用的细胞系(一共四种);dex样本是否被地塞米松(dexamethasone)处理过;albut第二种处理,这里忽略;avgLengthRNA测序的reads平均长度assay data
下载地址:https://raw.githubusercontent.com/Bioconductor/BiocWorkshops/master/100_Morgan_RBiocForAll/airway_counts.csv
> counts <- read.csv('airway_counts.csv', row.names=1)
# 读入是数据框,需要变成矩阵
> counts <- as.matrix(counts)
创建
SummarizedExperiment对象,整合assay和column data> library("SummarizedExperiment") > se <- SummarizedExperiment(assay = counts, colData = colData) > se class: SummarizedExperiment dim: 33469 8 metadata(0): assays(1): '' rownames(33469): ENSG00000000003 ENSG00000000419 ... ENSG00000273492 ENSG00000273493 rowData names(0): colnames(8): SRR1039508 SRR1039509 ... SRR1039520 SRR1039521 colData names(9): SampleName cell ... Sample BioSample这个
SummarizedExperiment对象可以假定为二维数据,构建的第一维度是counts值,第二维度是一些metadata> subset(se, , dex == "trt") class: SummarizedExperiment dim: 33469 4 metadata(0): assays(1): '' rownames(33469): ENSG00000000003 ENSG00000000419 ... ENSG00000273492 ENSG00000273493 rowData names(0): colnames(4): SRR1039509 SRR1039513 SRR1039517 SRR1039521 colData names(9): SampleName cell ... Sample BioSample # 看到colnames由上面的8个变成了4个从
SummarizedExperiment提取数据例如:
assay()提取count matrix,colSums计算总文库大小(每个样本的reads总数)> colSums(assay(se)) SRR1039508 SRR1039509 SRR1039512 SRR1039513 SRR1039516 SRR1039517 SRR1039520 20637971 18809481 25348649 15163415 24448408 30818215 19126151 SRR1039521 21164133 # 同样可以将结果添加进se的metadata > se$lib.size <- colSums(assay(se))下游分析
以DESeq2为例
> library("DESeq2")
> dds <- DESeqDataSet(se, design = ~ cell + dex)
# 注意这里的formula,其中cell是因变量,dex处理是自变量
# 得到的dds对象就非常像SummarizedExperiment
> dds <- DESeq(dds)
> head(results(dds))
> names(results(dds) )
[1] "baseMean"       "log2FoldChange" "lfcSE"          "stat"
[5] "pvalue"         "padj"
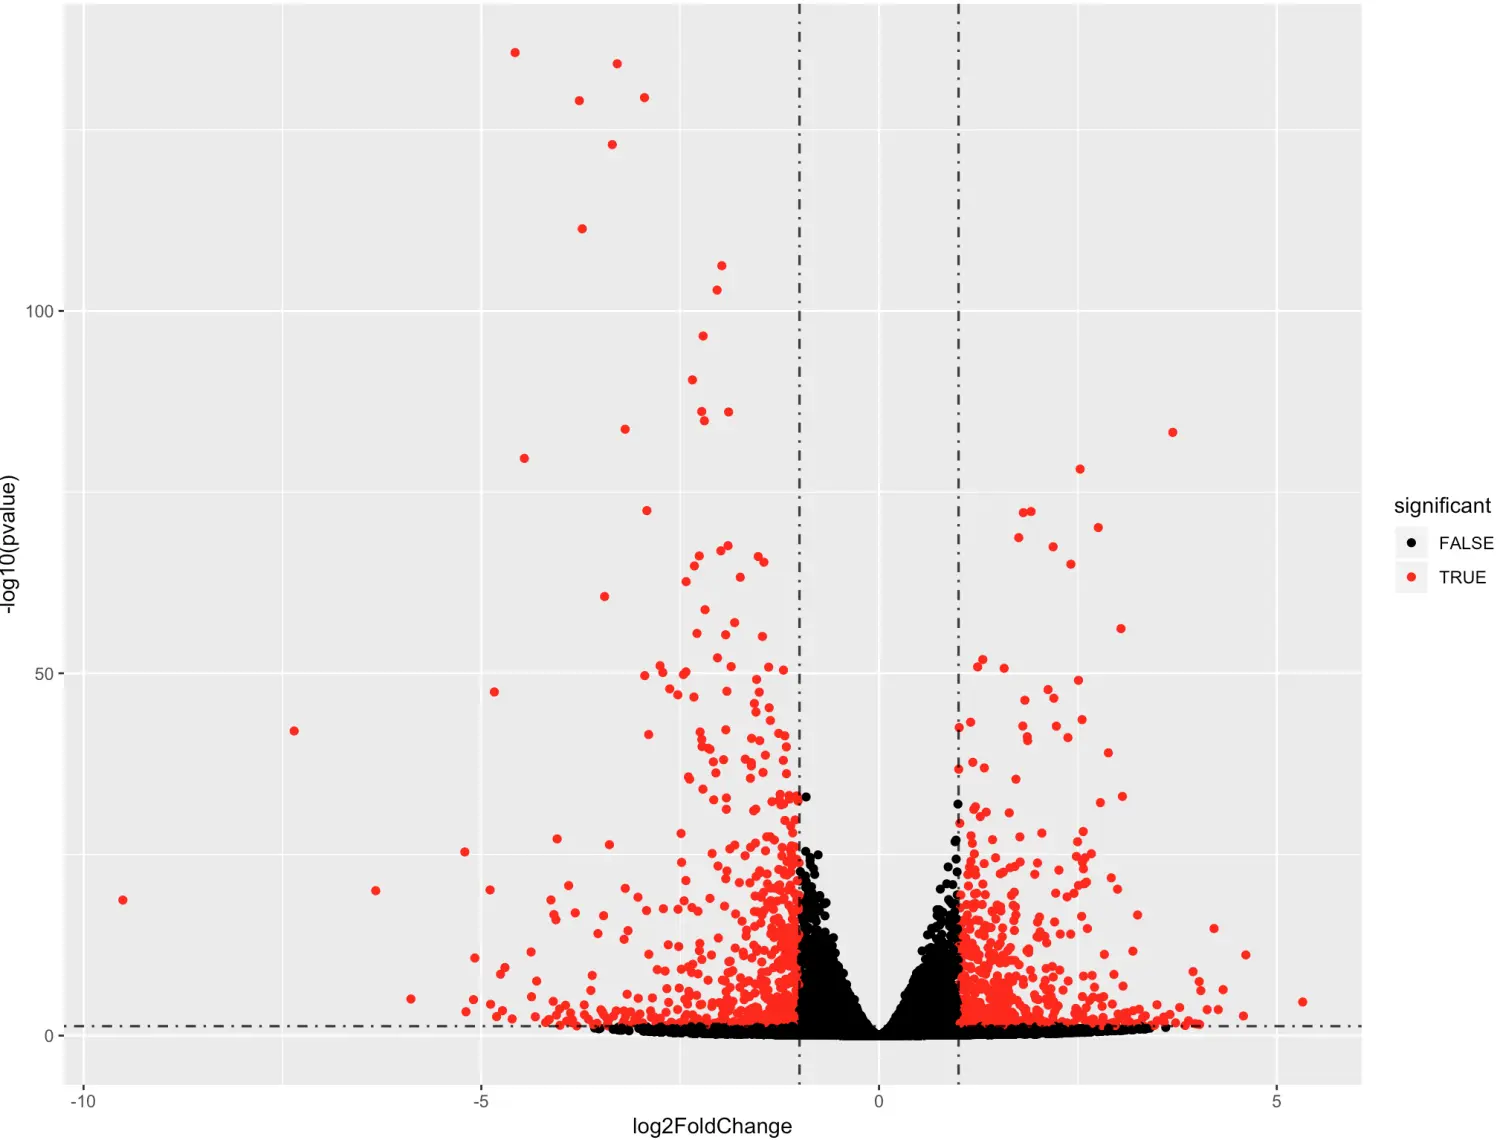
当然,得到了差异基因,就可以做一个最简陋的火山图
tmp <- as.data.frame(results(dds))

tmp$significant <- as.factor(tmp$pvalue<0.05 & abs(tmp$log2FoldChange) > 1)
ggplot(data=tmp, aes(x=log2FoldChange, y =-log10(pvalue),color =significant)) +
  geom_point() +
  scale_color_manual(values =c("black","red"))+
  geom_hline(yintercept = -log10(0.05),lty=4,lwd=0.6,alpha=0.8)+
  geom_vline(xintercept = c(1,-1),lty=4,lwd=0.6,alpha=0.8)